Habitat is a new project from Chef with the lofty goal of building a packaging system and runtime environment for "automation that travels with the app" to support the needs of modern distributed applications running in microservices environments.
Habitat has a lot of features, but today we will only learn enough about plans and packages to build and run a minimal Docker container for Ruby.
Table of contents
- Why build Docker images with Habitat?
- Installation
- CLI Configuration
- Start with a plan
- Enter the studio
- Build the package
- Export the package as a Docker image
- Testing the build
- Recap
Why build Docker images with Habitat?
Docker already ships with the docker build command that takes your Dockerfile, so what advantages does Habitat have over using the built-in docker features.
- Once you get used to their format and structure, habitat plans are actually a lot simple than Dockerfiles and eliminate all the crazy
&& \nonsense required to minimize the number of layers in your image. - Images built with habitat always start FROM scratch, resulting in smaller images without any unnecessary OS files.
- We won't cover this feature today, but habitat embeds a process supervisor in your image that is crucial to supporting Habitat's runtime features like service groups, config updates, and app deployments.
Of course, if you're not going to use Habitat's advanced features, building docker images with habitat may be more trouble than it's worth. Your mileage may vary.
Installation
If you plan on following long, you will need to download and install both Docker and Habitat. You can find the links for your OS on the Habitat install page.
CLI Configuration
Before you can use habitat, you must configure the CLI.
hab setup
This will ask you a bunch of questions you probably don't care about yet, so feel free to answer No to all of them. You can always run the setup later when you decide it's time to start publishing your own Habitat packages.
If you're like me, you want to know where Habitat stores your CLI configuration. Well, good news! The configuration is nested inside yet another .folder in your $HOME directory, ~/.hab/etc/cli.toml. I must have a hundred of these dotfiles and folders by now.
Start with a plan
In habitat, a plan is a directory containing files that tell Habitat how to build a package, which is the unit of distribution for software built with Habitat.
Let's start by creating a plan for Ruby.
hab plan init ruby
This creates an empty plan with a few files and directories. The only one that is required, and the only one we will use today, is the plan.sh.
$ ls -1F ruby/
config/
hooks/
default.toml
plan.sh
plan.sh is a bash script that describes how to build your package. If you're not used to writing shell scripts, this can feel pretty startling.
Wat! No YAML config? No DSL? But I'm just a developer! Help?
Fortunately, you hardly have to know bash to comfortably edit plans. Plans consist of two sections:
- A set of
key=valuevariables used to configure your package. - Pre-defined functions you modify to customize how Habitat builds and installs your package.
The generated plan.sh file documents what each variable means along with the purpose of each function.
Below is a condensed version of our Ruby plan, which I liberally borrowed from Habitat's core/ruby plan. In fact, what better way to learn about plans than by reading the plans written by the Habitat creators.
If you take a minute to study the plan closely, most of it is pretty self-explanatory. For the few unfamiliar parts, take a look at the full, commented version of the plan. Only the portions of the plan I changed are included below.
pkg_name=ruby
pkg_origin=jbgo
pkg_version=2.4.0
pkg_source="https://cache.ruby-lang.org/pub/ruby/2.4/ruby-2.4.0.tar.gz"
pkg_shasum="152fd0bd15a90b4a18213448f485d4b53e9f7662e1508190aa5b702446b29e3d"
pkg_deps=(core/glibc core/ncurses core/zlib core/openssl core/libyaml core/libffi)
pkg_build_deps=(core/make core/gcc)
pkg_lib_dirs=(lib)
pkg_include_dirs=(include)
pkg_bin_dirs=(bin)
pkg_interpreters=(bin/ruby)

do_build() {
  CFLAGS="${CFLAGS} -O3 -g -pipe"

  ./configure "--prefix=$pkg_prefix" \
              --enable-shared \
              --disable-install-doc \
              "--with-openssl-dir=$(_resolve_dependency core/openssl)" \
              "--with-libyaml-dir=$(_resolve_dependency core/libyaml)"

  make
}

do_check() {
  make test
}

do_install() {
  do_default_install
  gem update --system --no-document
}
Note: You can obtain other versions of the Ruby source code URL and checksum from the Ruby downloads page.
Enter the studio
Now that you have a plan.sh, it's time to build a package. In order to do that, you have to enter the habitat studio.
cd ruby/
hab studio enter
This was the second surprising moment for me while learning Habitat. What is this studio and why do I have to enter it?!
The studio is a minimal, clean, chrooted shell environment for you to build and test your Habitat packages. The studio itself is a Habitat package, and all of the dependent packages for the studio will be downloaded, unpacked, and installed. The studio will also import the secret origin key created during hab setup. When running Mac OS X on your host machine, the studio runs inside a Docker container as root.
Ok, I get it, now back to building the package.
Build the package
Within your studio environment, run
build
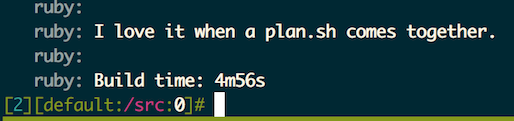
If everything goes as planned, you will see the following success message:
If something fails, you can invoke attach in your plan to get a shell for debugging.
do_install() {
  do_default_install

  # invoke attach here to figure out why gem update fails.
  attach

  gem update --system --no-document
}
Export the package as a Docker image
This is where the fun starts! You can export your package as a Docker container.
hab pkg export docker jbgo/ruby
If you pay close attention, you can extract the Dockerfile commands from the habitat output. So far, I haven't been able to figure a way to tell habitat to print the Dockerfile without building the image. Do I smell a pull request coming?
FROM scratch
ENV PATH /hab/pkgs/jbgo/ruby/2.4.0/20170308183419/bin:/hab/pkgs/core/...omitted
WORKDIR /
ADD rootfs /
VOLUME /hab/svc/ruby/data /hab/svc/ruby/config
EXPOSE 9631
ENTRYPOINT /init.sh
CMD start jbgo/ruby
What about image size? Let's see how the habitat image compares to the official Ruby images.
[14:08:10] ../ruby $ docker image list | grep ruby
jbgo/ruby                                   2.4.0-20170308183419   a4d17b1ceb67        21 minutes ago      218 MB
jbgo/ruby                                   latest                 a4d17b1ceb67        21 minutes ago      218 MB
ruby                                        2.4.0-alpine           d86a3f8dee7a        42 hours ago        60.8 MB
ruby                                        2.4.0-slim             6ba8bf834865        42 hours ago        223 MB
ruby                                        2.4.0                  9de00c83e1f1        42 hours ago        681 MB
Hmmm, not as minimal as I was hoping for, especially compared to the alpine image. Will have to investigate why in the future.
Testing the build
Finally, let's actually run our ruby container to verify that it actually works.
 $ docker run --rm -it --entrypoint=/bin/bash jbgo/ruby -c irb
irb(main):001:0> puts "hello habitat"
hello habitat
It works!
One important thing to note is that habitat generates an /init.sh script as the entrypoint with start as the command. When running a container as a habitat service, init.sh starts the supervisor in your container, which in turn starts your (ruby) service. Because we want to run Ruby interactively instead of as a service, we have to override both the entrypoint and the command. The choice of /bin/bash -c "COMMAND" is to source /etc/profile so that the $PATH includes our ruby binaries.
Recap
If you're still with me, congratulations! You've just created your first habitat package and exported it as a Docker image. If you're feeling adventurous
- Publish your newly created Habitat package to the depot.
- Add additional runtime dependencies to the package so that gems requiring native extensions like
nokogiriandpgwill install successfully. - Use your new Ruby package as a dependency for a Rails (or Sinatra) application package.